A study conducted by McKinsey & Company revealed that 71 percent of consumers expect to get personalized experiences in their commercial emails. So the generic “Dear Customer” emails won’t make a good impression anymore.
However, you may require an all-in-one ESP to send personalized emails to a huge audience, and not everyone can afford one or have time to learn new ESP softwares. But you need not need to worry as you can use mail merge in Outlook to send personalized emails without using an ESP. All you need are three Microsoft apps: Word, Excel, and Outlook.
Let’s uncover the details of mail merge in Outlook and the method of sending personalized emails using it.
Table of contents
- What is mail merge in Outlook?
- When should you use mail merge in Outlook?
- How to send personalized emails via mail merge in Outlook?
- Advanced features of mail merge in Outlook
- Take personalization to the next level
What is mail merge in Outlook?
Mail merge in Outlook is a method of sending personalized emails in Outlook. This method requires three tools from Microsoft: Word, Excel, and Outlook. So make sure to install all three and set up your accounts before proceeding with the next steps.
In Outlook, you can use mail merge to send emails like greetings, offers, invoices, work attachments, holiday emails, etc. However, you will find a few limitations while using this method, so it may not suit every scenario. So let’s look at when you should and should not use mail merge in Outlook.
When should you use mail merge in Outlook?
Outlook itself doesn’t have any sending limits but not in Outlook.com and for Microsoft 365 subscribers. Microsoft does impose a sending limit for these cases, as shown below.
Outlook.com sending limits
For non-subscribers of Microsoft 365 subscriptions, the limits vary depending on the account’s credibility in the system.
For Microsoft 365 subscribers, you can send emails to a maximum of 5,000 recipients a day, and each message can be sent to a maximum of 500 recipients.
Microsoft 365 subscribers’ sending limits
You can send emails to 10,000 recipients per day.
You can send only 30 messages per minute.
Due to these limitations, this method of sending emails may not be ideal for you. This is a suitable solution for users with a small list. This is not ideal for users who have a list of tens of thousands of recipients and need advanced personalization features.
So assuming you have a small list, follow these steps to send personalized emails via mail merge in Outlook.
How to send personalized emails via mail merge in Outlook?
The entire process involves mainly two steps:
Configuring your data in Excel.
Configuring your email in Word and sending the emails.
Let’s discuss these steps one by one.
1. Configuring your data in Excel
Follow these steps to set up your Excel sheet:
- Open a new Excel document and add the required fields. While you can add or remove any column you want, you must add the Name and Recipient columns with their respective data.

- Press Ctrl + S to save your document. Give it an appropriate name like “Customer details” or an easily understood name and close the Excel app.
2. Configuring your email in Word
Follow these steps to create your email in Word:
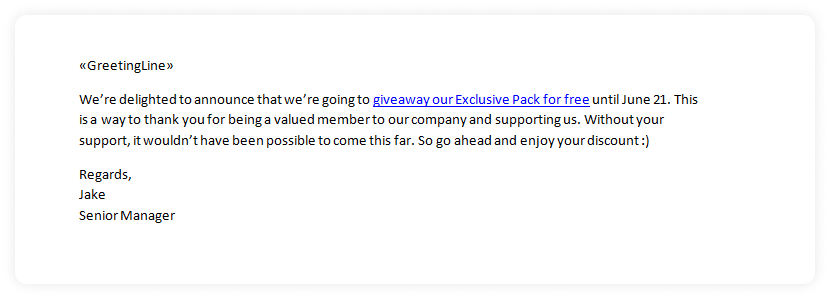
- Open a new Word document and create the email body. You have the freedom to create any type of email layout, but we’ve used a generic email template for this guide.

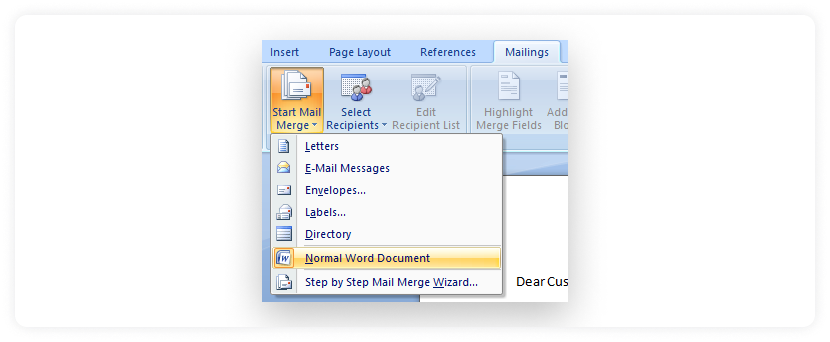
- Go to Mailings > Start Mail Merge > Normal Word Document. You have many options, but choose Normal Word Document for this guide.

- Go to Select Recipients > Use Existing List. Then select the Excel file that you previously created.

Then select the sheet that contains the customer data in that Excel document and click OK.
After that, select the first line and click the Greeting Line.

- Then select the greeting format. You can choose any format you want but for this guide, choose Dear from the first dropdown, Joshua Randall Jr. from the second dropdown, and a comma (,) from the third dropdown.

- Then type “Dear Customer” or another appropriate name that’ll be shown to invalid recipient names.

You can preview the greeting line for each recipient using the given arrows. After all of the above steps are completed, click OK.
Now a “«GreetingLine»” will appear on the first line. If the “Dear Customer” still appears together with the “«GreetingLine»”, you need to remove it.
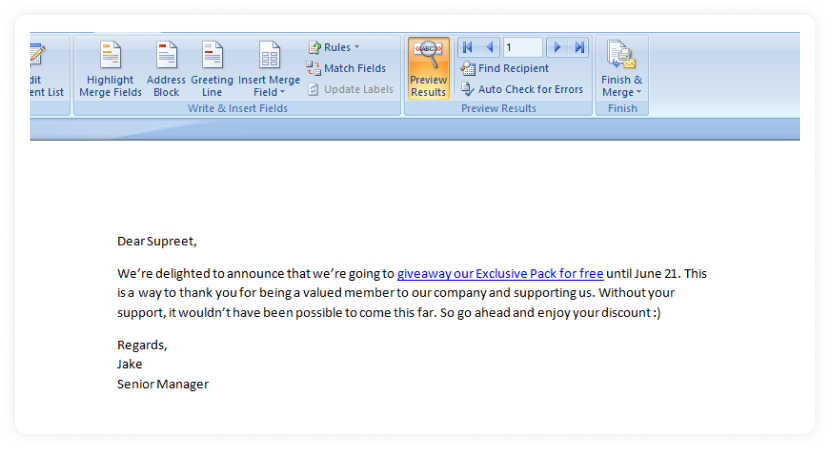
- If you want to preview the final results, click Preview Results from the navbar. Use given arrows to see how the email will look to different recipients.

- If everything looks as desired, it’s time to send emails. Go to Finish & Merge > Send E-mail Messages.

- A popup will appear in which you'll have to configure your email data. Select the column's dropdown in the To field that contains recipient emails. In this example, the Recipient column contains all the emails, so we must select the Recipient column.

- Enter your subject line in the next field and select HTML from the Mail format dropdown.

- You can send this email to all records or current records or choose a range. Select All for this guide and click OK.

Outlook will automatically send this email to all recipients mentioned in the Excel sheet.
Advanced features of mail merge in Outlook
Apart from sending simple personalized emails, you also have the freedom to perform advanced actions such as adding attachments, CC, BCC.
Mail merge in Outlook doesn’t let you add attachments by default. So you’ve to use an external toolkit to add attachments and use other advanced features. Follow these steps to configure the toolkit:
Go to this link and download the MERGE TOOLS ADD-IN.zip.
Extract the content of the files.
Then go to File > Word Options. This may be pronounced as just Options for modern versions of Word.

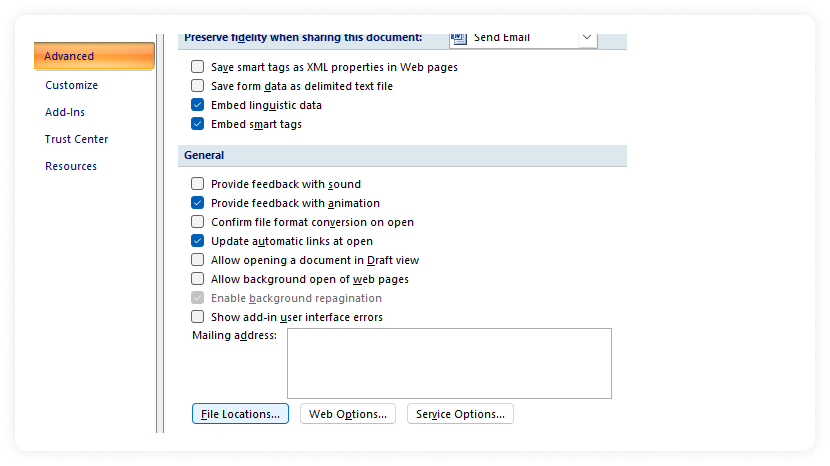
- Go to Advanced > General > File Locations.

- Select Startup and click Modify.

Then it’ll open File Explorer. Copy the address of that folder.
Close this instance of File Explorer and open it separately as a separate app.
Paste the copied address into the search bar. The copied address looks something like this: C:\Users\ADMIN\AppData\Roaming\Microsoft\Word\STARTUP

Open another instance of File Explorer and go to the folder of MERGE TOOLS ADD-IN.zip you initially downloaded. You’ll see a MergeTools - 2022 file. Drag and drop it to the initial Explorer path you opened.
Close the Word app and reopen it. Open the word file you initially created.
Adding attachments, CC, and BCC
You’ve successfully configured the toolkit in the previous steps. It’s time to add attachments and send them. Follow these instructions to do it right:
Open your initial spreadsheet, create a column called Attachments and add the attachments address to its column below.
Open the initial Word document and go to Merge Tools > Merge with Attachments.
From the first list items, select click Attachments and click Add. We selected Attachments since that is the column where we mentioned the attachment locations.
From the Merge Destination dropdown, select Merge to Email Message.
You can add CC and BCC email addresses from the next dropdowns.
Then add the subject line and click Continue.
Then you’ll see three options to choose from. For this guide, choose All and click Ok.
That’s it. Outlook will send your messages in the background with the personalized attachments you mentioned.
Take personalization to the next level
Mail merge in Outlook is an amazing way to send personalized emails, and you can use it to get a feel of sending personalized emails.
However, opting for a complete email marketing solution like Mailmodo is a better choice if you want to unlock the full potential of email personalization with features like triggered emails, list segmentation, and personalized AMP email creation.
Besides that, if you use Gmail then you can read our guide on how to perform Mail merge in Gmail to send personalized emails.
What you should do next
Hey there, thanks for reading till the end. Here are 3 ways we can help you grow your business:
Talk to an email expert. Need someone to take your email marketing to the next level? Mailmodo’s experts are here for you. Schedule a 30-minute email consultation. Don’t worry, it’s on the house. Book a meet here.
Send emails that bring higher conversions. Mailmodo is an ESP that helps you to create and send app-like interactive emails with forms, carts, calendars, games, and other widgets for higher conversions. Sign up now and send 10k free emails/month. Sign up here.
Get smarter with our email resources. Explore all our knowledge base here and learn about email marketing, marketing strategies, best practices, growth hacks, case studies, templates, and more. Access guides here.

