Great customer communication is the key to success in business, and Zoho CRM brings you one step closer to success by integrating communication channels to scale your relationships.
Emails are unarguably one of the largest customer communication channels. Using Zoho CRM, you can send and receive emails, set up emails, and handle user emails.
Although a 2 to 5 percent email conversion rate is considered decent for most businesses, AMP emails are setting new records and benchmarks for conversions. But unfortunately, AMP emails are not a thing yet for Zoho CRM.
If you want to see AMP emails do wonders for your business but are not fond of leaving Zoho CRM, we're here to help. Let's see how you can send AMP emails with Zoho CRM using Mailmodo integration.
Table of contents
- Does Zoho CRM have AMP emails?
- Benefits of using Zoho CRM integration with Mailmodo
- How to send AMP emails from Zoho CRM using Mailmodo
Does Zoho CRM have AMP emails?
Zoho CRM lets you create and send static emails which don’t have interactivity embedded into them.
Additionally, creating dynamic AMP emails with forms, carts, and feeds is not possible yet.
But you don’t need to drop AMP emails altogether, as we at Mailmodo have built a Zoho CRM integration for people like yourself who want to try AMP emails but are locked with Zoho CRM. So, let’s see how to use it step by step.
Benefits of using Zoho CRM integration with Mailmodo
Here are some benefits of integrating your Zoho CRM account with Mailmodo to send AMP emails:
If you want to build your template from scratch, you can do that without hiring programmers.
Mailmodo has a catalog of beautiful templates you can choose from and quickly set up your campaign.
You can complete the process quickly by following a few simple steps for the integration process.
We keep coming up with exciting components like spin the wheel, which you can add to your emails and leave a lasting impression on your customers.
How to send AMP emails from Zoho CRM using Mailmodo
Follow these steps to integrate Zoho CRM and Mailmodo successfully:
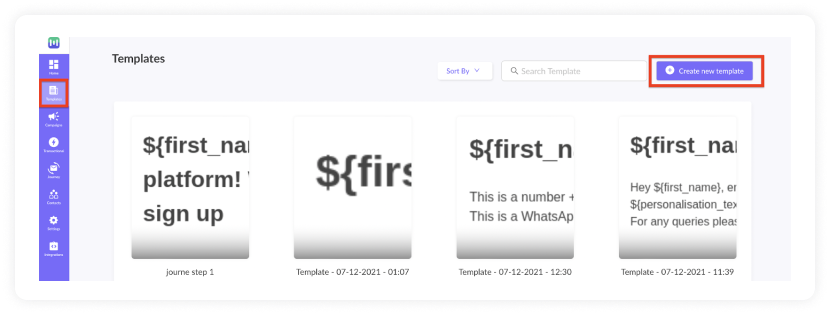
- Go to templates from the vertical menu on the left side. Click on create new template.
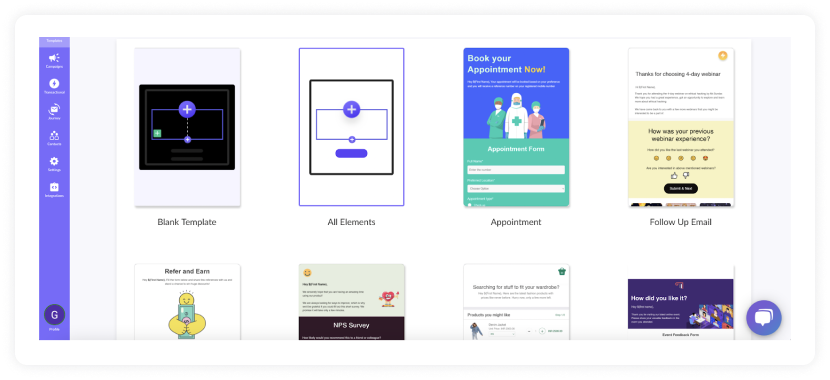
Either select a blank template or a pre-made template
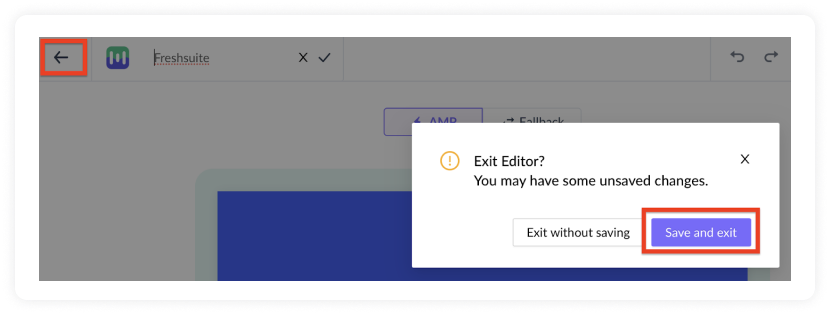
Use the editor to edit the template. Save and rename the template upon completion. After saving, click on the back arrow.

Click on save and exit.
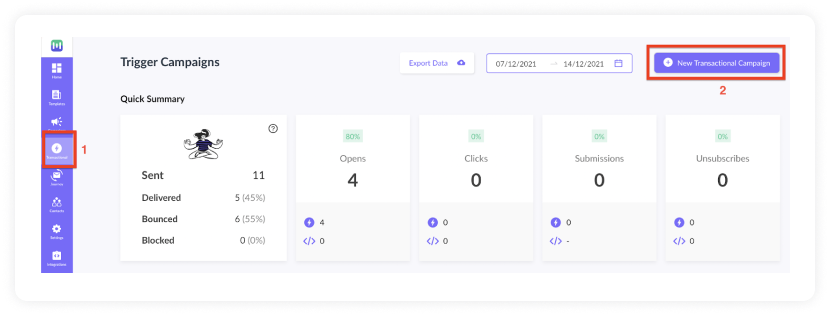
You will be redirected to the home page. Click on transactional from the vertical menu on the left. Next, click on New Transactional Campaign.
Select the template you saved before. Click on next.
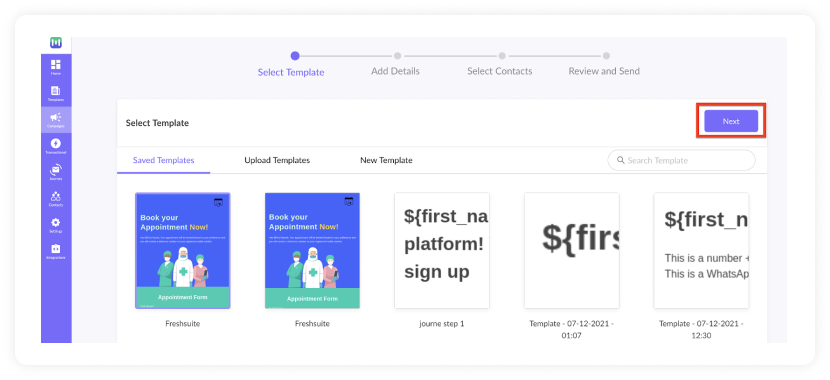
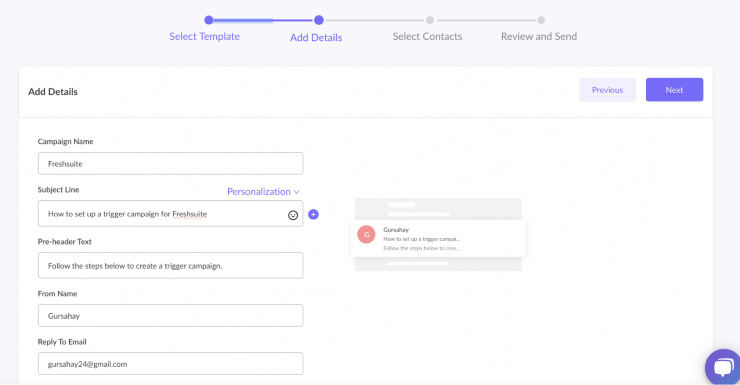
Add Subject Line, Pre-header text, From name, and Reply to email. Click on next.
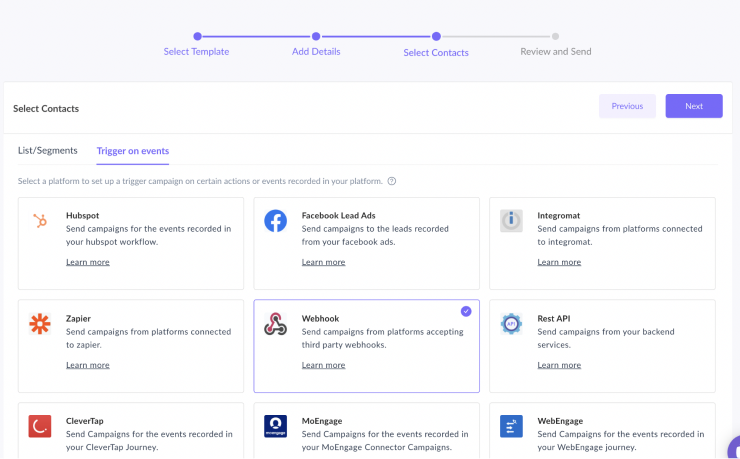
- You will be redirected to trigger on events. Select Webhook from the list of platforms. Click on next.
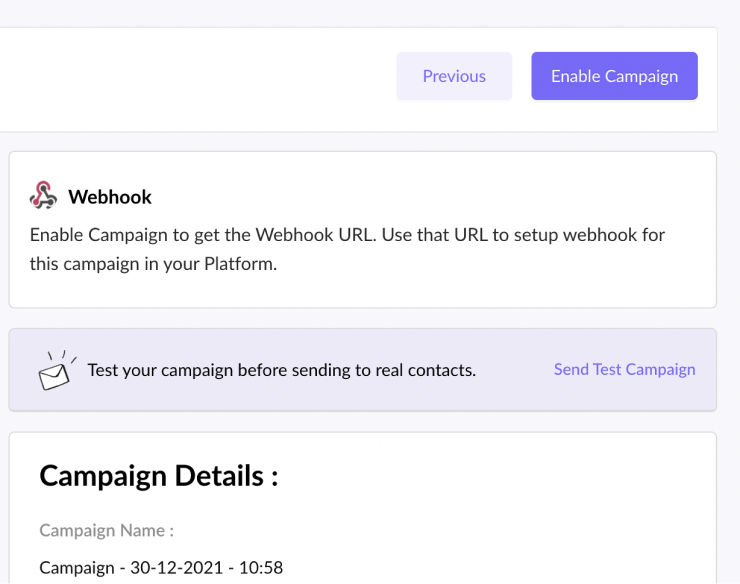
- Review and test your campaign. To test, click on send test campaign > enter email ID > send test email.
Once tested and reviewed, click on the enable campaign.
- You will be redirected to the Trigger Info section. Click on the Copy URL button. We will use this webhook url in Zoho CRM.

To access this page in the future, go to transactional in the vertical menu (left side) > select the campaign > trigger info.
Zoho CRM Setup
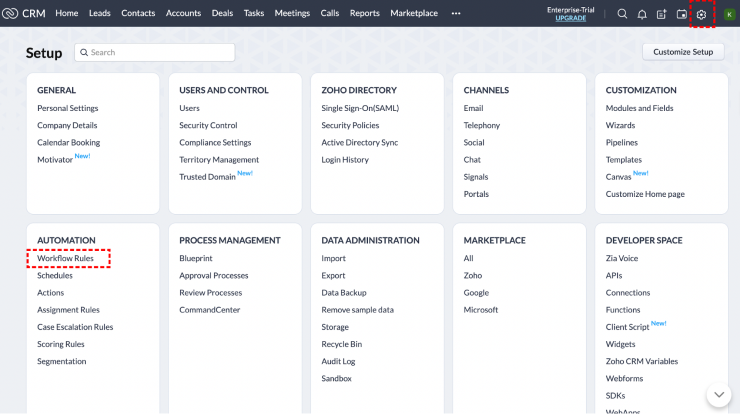
- From your Zoho CRM home page, click on Setup (Gear Icon) > Automations > Workflow Rules.
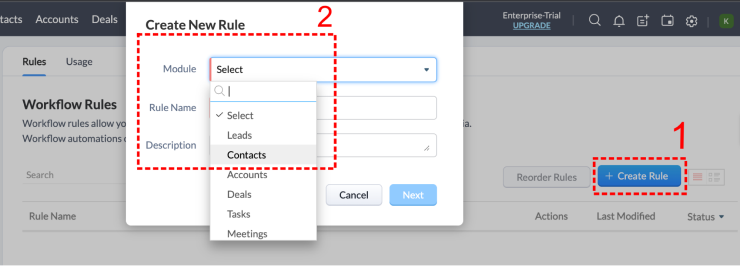
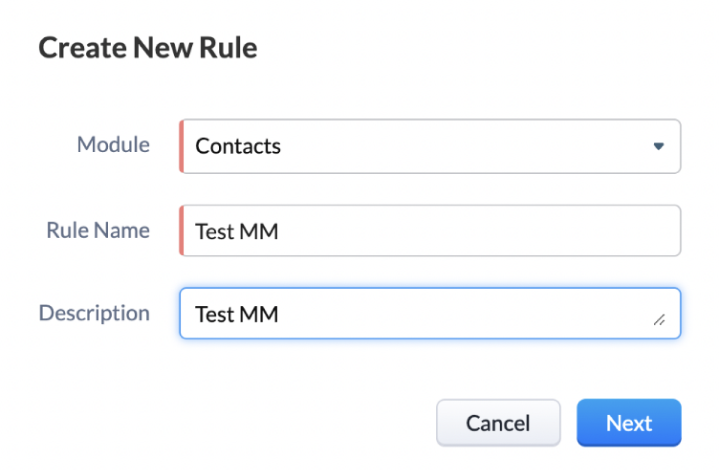
- Click on Create Rule > Select a Module, for ex > Contacts > Add Rule Name and Click Next.
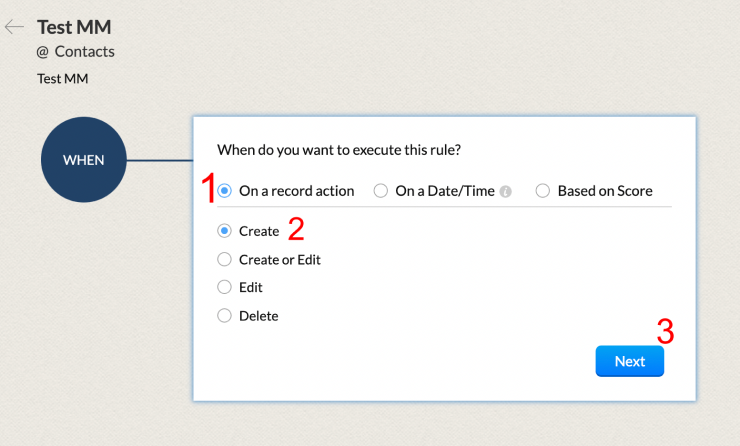
- Add an event by selecting an option for, 'When do you want to execute this rule?'.
For example, Select, 'On a record action' > Create. It would mean, You want to execute this workflow when a contact is created.
Click Next to add conditions in the workflow. For example, here you can select, 'All Contacts', this would mean that this workflow would consider all the contacts.
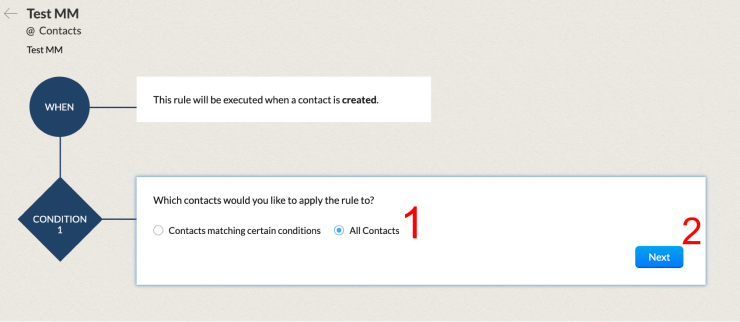
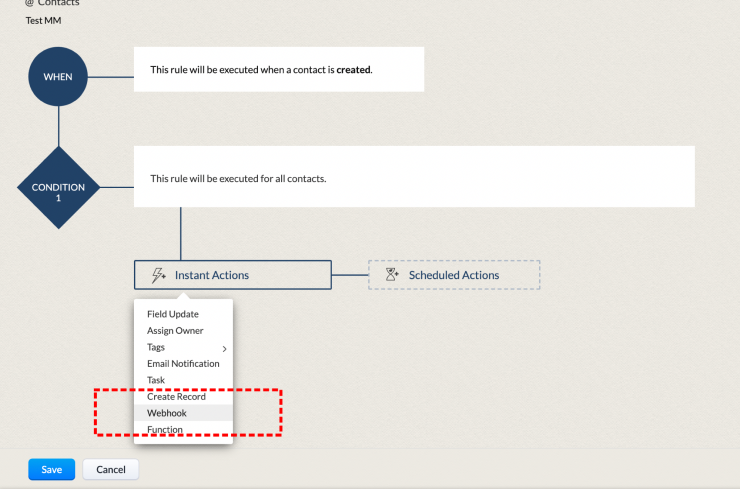
Click Next and Choose Webhook as an Instant action.
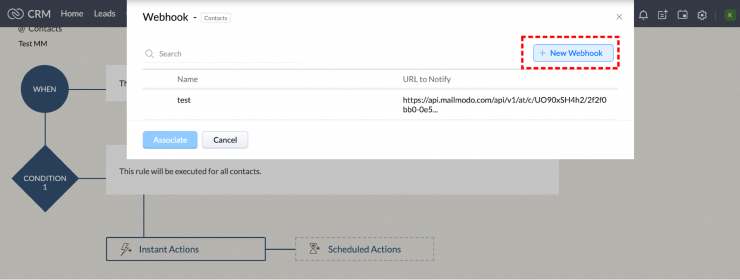
Click on New Webhook to set up the configuration.
Follow the steps in the video and add the relevant details.
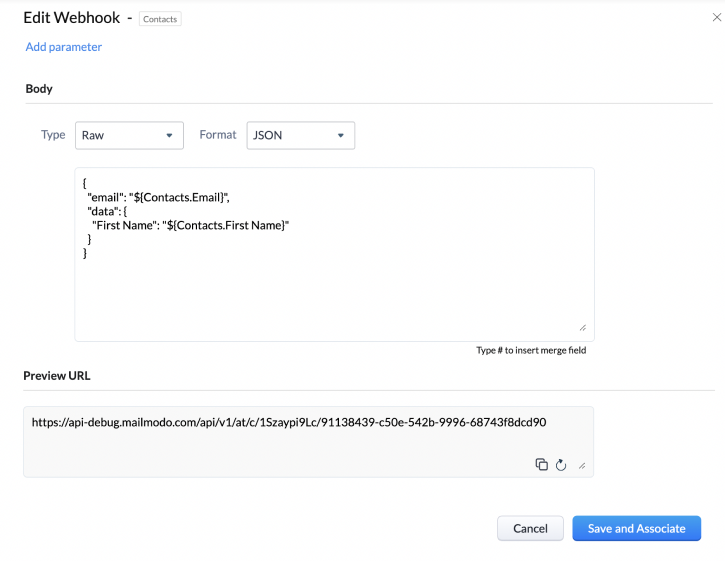
- Paste the URL copied from Mailmodo's Trigger Info section. Select request Method as POST.
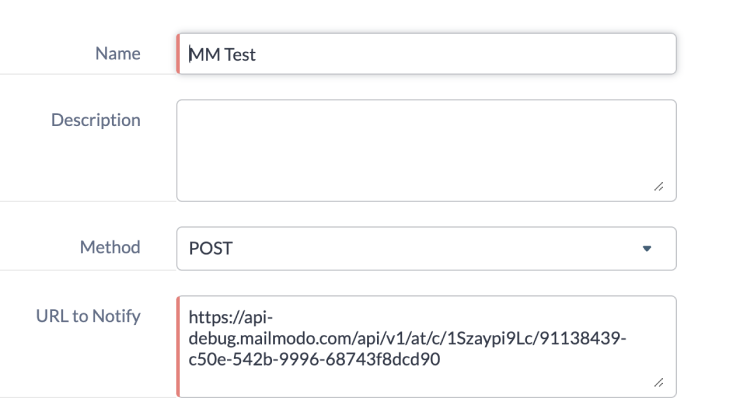
Select body type as raw and format as JSON. Copy and paste the following code snippet in the body :
{
"email": "",
"data": {}
}
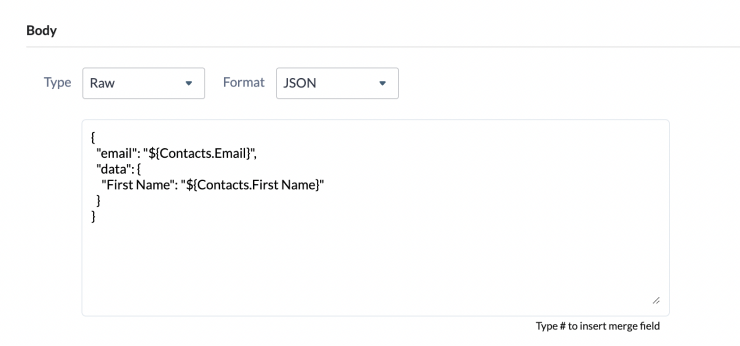
- Map the respective parameters as shown in the video. Place the cursor in between the double quotes and type "#". Select the relevant user attribute from the drop-down list.
After mapping, the body should look like this:
{

"email": "${Contacts.Email}",

"data": {}

}
The argument to “email” points to recipient emails, and “data” points to the personalization parameters.
Note: You can add more parameters (depending on the campaign) by adding a few extra lines of code in the “data” section.
- Make sure that the parameter's key is exactly the same as the key written in the email.
For example:
{

"email":"abc@gmail.com",

"data":{

"first_name":"John",

“last_name”:”Doe”,

“Age”:”18”,

}

}
Replace the parameter ‘John’ with ‘# and select the appropriate field matching the parameter ‘first_name’.
Click on Save and Associate to complete the setup.
- Once everything is configured, click on Save to set the Rule active.
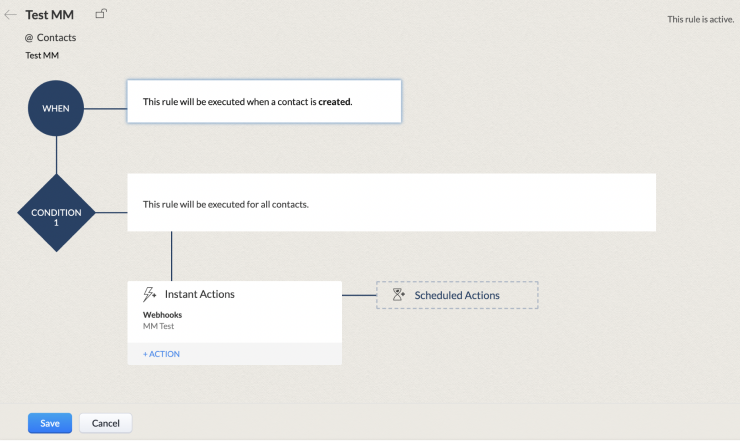
Congratulations! You have successfully created a trigger campaign!
Zoho CRM is overall a good software to manage your customer communications. But, you can’t ignore the power of AMP emails either. So, our Zoho CRM integration is the most appropriate way to get the best of both worlds. Go ahead and integrate both platforms and set AMP emails up to work for you.
For tips to accelerate your email conversion rate with AMP, check out our guide to understand the different strategies you can leverage to boost conversions.
What you should do next
Hey there, thanks for reading till the end. Here are 3 ways we can help you grow your business:
Talk to an email expert. Need someone to take your email marketing to the next level? Mailmodo’s experts are here for you. Schedule a 30-minute email consultation. Don’t worry, it’s on the house. Book a meet here.
Send emails that bring higher conversions. Mailmodo is an ESP that helps you to create and send app-like interactive emails with forms, carts, calendars, games, and other widgets for higher conversions. Sign up now and send 10k free emails/month. Sign up here.
Get smarter with our email resources. Explore all our knowledge base here and learn about email marketing, marketing strategies, best practices, growth hacks, case studies, templates, and more. Access guides here.

